

Introduction
The website consists of active page content created by the Websys system and files and folder tree of content. Many different file formats are supported but the main types for providing users with textual information is the HTML and PDF formats.
The PDF format is really a printer format. It provides a direct, never changing piece of paper view of a document with text and pictures laid out in a fixed way. It is a relatively easy format to produce but has a few issues when used on a website. The main one is that the layout does not change for presentation on devices with smaller screens like phones. Another issue is that it is more difficult for search engines to read and understand to add to search engines lists and so is not good when users want to find the information.
The HTML format was designed for the WEB and has developed over the years. It is a relatively simple format where chunks of text are marked with tags as being of a particular type like a heading or a paragraph etc. Pictures are in separate files like JPG or PNG files and linked to locations inside the document by particular tags. HTML pages can be created using a simple raw text editor, if you know what you are doing, or by using a HTML editor like that provided on this website that provides a similar editing experience to using a word processor. It is also possible to use a word processor on your PC and export to a HTML format set of files (HTML and picture files) although the created HTML can be a bit messy.
The HTML format allows the structure of the document to be described, such as headings, tables, lists etc. It also provides styles such as font types, sizes, colours to use etc. As well of these there are tags to help with positioning of the documents elements on the screen. When a web browser reads a HTML file it will render it to the users device screen using the instructions in the HTML file and its own knowledge of the devices it is displaying on. Thus the page will be rendered differently on a mobile phone verses a large PC's monitor. The use of appropriate HTML tags for this to happen well is the most difficult bit! However there are a few simple methods that can be used that work well in most cases. There is a lot of information on the WEB on HTML documents, its structure and how to edit them.
In general using the Websys HTML editor is very similar to using a conventional word processor application. However there are some important differences:
- Any pictures are held in separate files with a link to them included in the HTML document rather than embedded within a word processor single file.
- A HTML page does not have a static page layout like a word processor which is designed for static printed paper documents. HTML documents are dynamically rendered by the users web browser to work on the device in use. This can also include blind peoples screen reader applications.
- The website theme provides most of the style for a document so it matches the current website theme. So it is important not to change styles to much in the document you are editing.
Website Files and Page Editing
This Websys website provides a number of tools for file management and editing of HTML documents. Although it is possible to edit with a mobile phone, as with most things, content creation is best done with a larger screen on a PC.
You first need the user rights to be able to add and edit content (the adminContent role or full admin role) a Websys administrator can set this on your login account. When administrating the website it normally requires the use of the left hand admin menu. This can be toggled on and off using the ![]() top menu left hand button.
top menu left hand button.
If you have the adminContent role you should see a web page like:
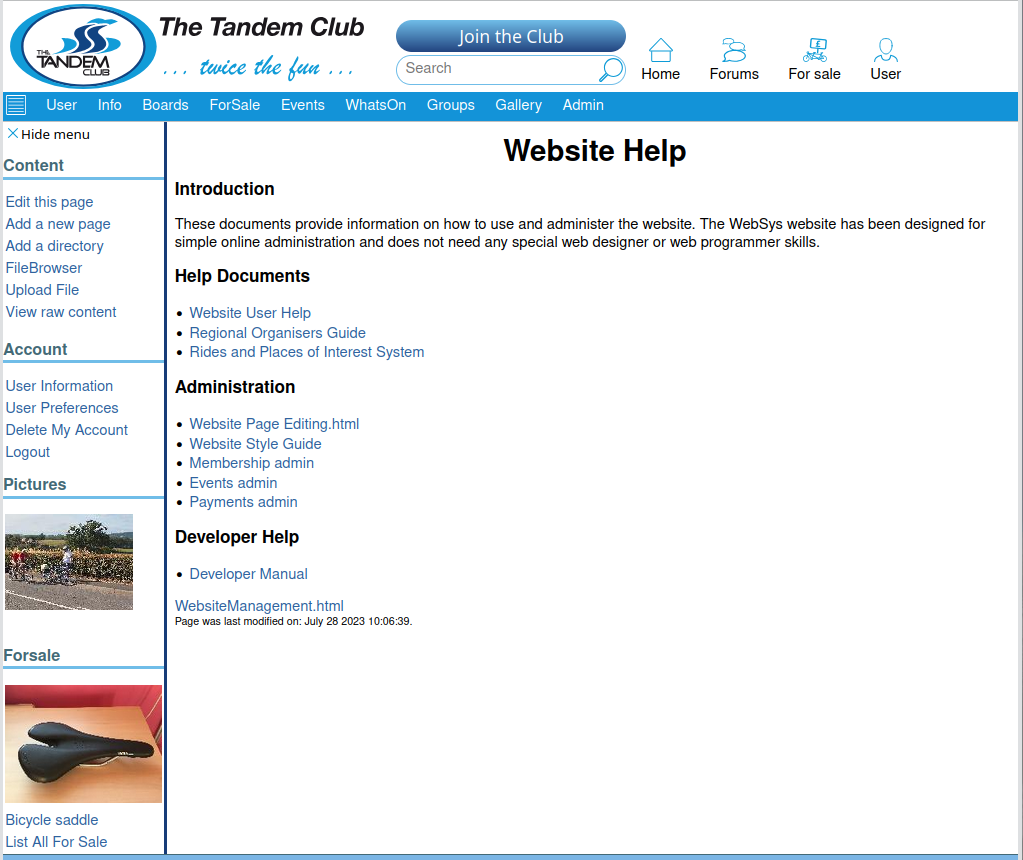
In the left hand admin menu there are the functions:
- "Edit this page": Which displays the HTML editor allowing you to edit the HTML document.
- "Add a new page": This adds a new page (HTML file) in the current directory (Folder) with a file name as entered by the user (no spaces please).
- "Add a directory": This creates a directory (Folder) and creates an "info.html" file there which you can edit.
- "FileBrowser": This displays a file browser that allows you to view the files on the system and upload new files including pictures.
- "Upload File" A simple single file uploader.
On particular WEB HTML pages on the system you will see a "Edit this page" link in the left hand menu and on some pages a (E) link after the title of something.
The FileBrowser looks like:
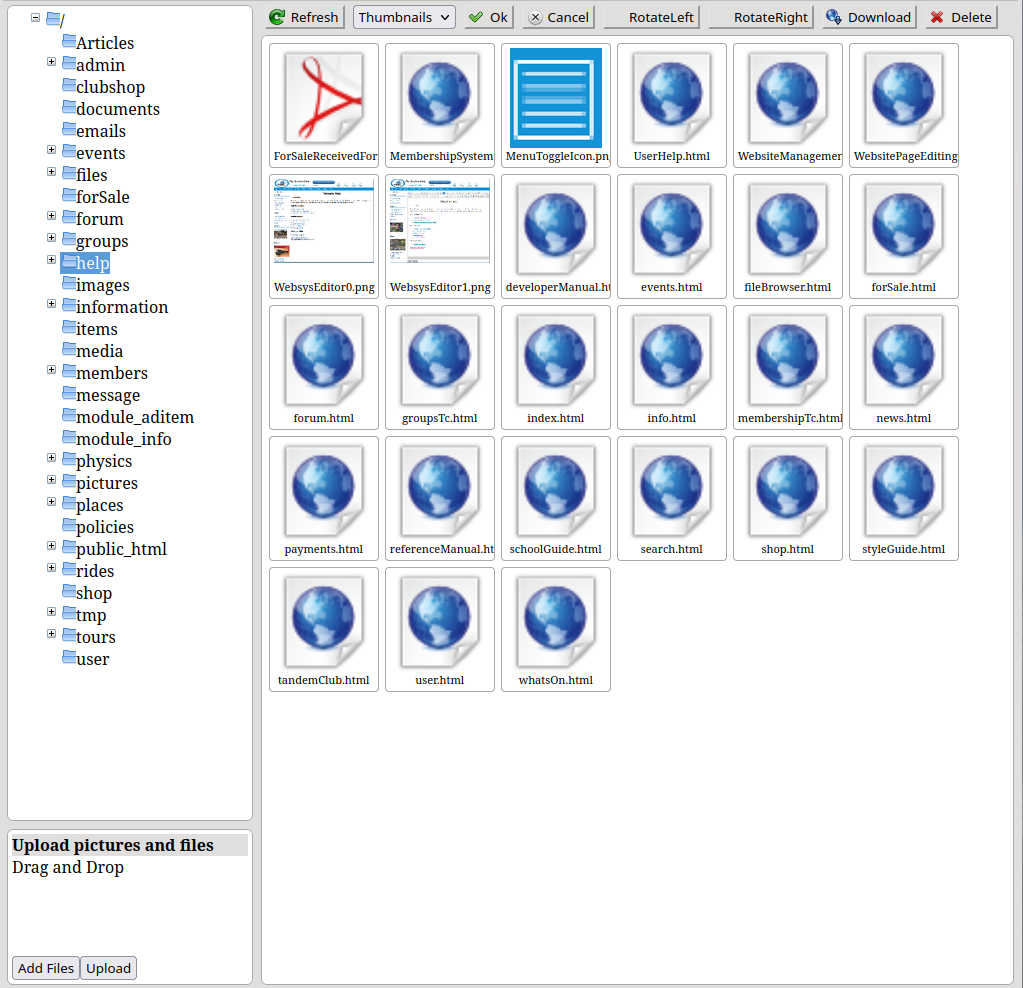
This shows the files in the same directory (Folder) as the page you are editing by default. The bottom left "Upload pictures and files" box allows you to upload pictures and files. All pictures will be resized to a maximum of 1920x1080 before uploading.
When you edit a HTML file you will be presented with the HTML documented editor:
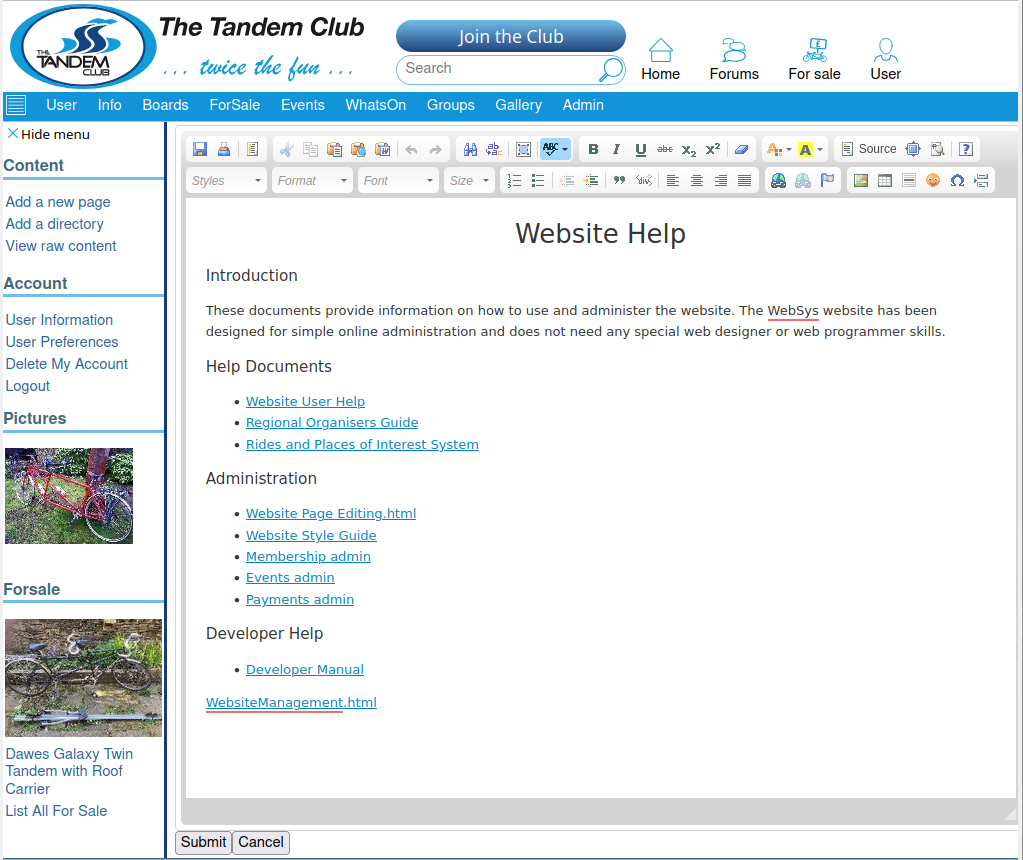
The page editor presents a word processor like interface with a set of toolbar entries along the top. Normal word processing features such as paragraph style, bold, Italic, bulleted or numbered lines etc can be used. The system can also create hyperlinks to other website pages or off-site pages using their URL.The "Submit" button saves the document and closes it. You can also use the <CTRL>-S key sequence to save the document while editing as you go along. Hovering the mouse cursor over a button describes its usage.
It is possible to copy and paste text into this editor using the <CTRL>-<SHIFT>-V or <CTRL>-V key sequences. Note it is normally useful to to copy and past the plain text rather than the full formatted text. The full formatted text does match the original better, but the formatting sometimes overrides the systems style.
The Website HTML page your are editing is stored in a directory/folder on the system. Here you can add any number of WEB pages and sub directories (Folders). Each page can be simply edited on-line using the simple Word Processor like editor provided or files can be uploaded using the FileBrowser.
The "Add a new page" button can be used to add a new webpage. A link will be added at the bottom of the current page to link to it. Please use a short page name without spaces where possible. Once you have edited the new page you will probably want to edit the parent page and move/format the link as desired changing its title text as wanted.
The "Add a directory" button can be used to add a separate directory (folder) with an initial index.html page. this is useful to structure your additional information.
HTML Directories and Files
A HTML file has the suffix ".html". When the system/webbrowser sees files of this type it will render them onto the users screen. It is useful to organise these HTML files into separate directories (folders) to group like files together and with the pictures they use. Within a directory there are two special files: index.html and info.html.
If a directory has the file index.html then when the user goes to that directory the contents of the index.html file will be shown. This could be an overview with links to other HTML files in the directory or the entire content.
If a directory has the file info.html then when the user goes to that directory the contents of the index.html file will be shown and following it a list of the files in the directory. This could be an overview with links to other HTML files in the directory.
HTML Styling
The main thing here is to provide information on the structure of your document, not really what it looks like. The Websys system will style things like headings using a cross website styling system. If you structure your document with things like headings, search engines as well as Web browsers and blind screen readers will have more information to go on. Try not to have things that have a large fixed width. Normally the system/browser will rescale things like images, but things like multiple columns might have to be handled specially. See the HTML Layout section for more info.
In general you can use the simple HTML toolbar editing functions to format the text you type of copy and paste into the HTML document, However there are some things top be aware of:
- Headers: Use the standard "Heading 1", "Heading 2" , "Heading 3" etc. formats for headings of things, don't just make the text bold. This allows the web browser to understand the text is a header and format the page better. It is also of great use to search engines. Typically use "Heading 3" for normal in page headings and "Heading 4" for smaller sub headings. For large titling use "Heading 1" for largest top most headings "Heading 2 " for smaller sub headings and so forth.
- Fonts: Try to keep to the standard font so the websites style engine can change the style of all content.
- Pictures: See below.
- Links can be added to different areas of the website or to other sites.
- Tables are useful for structuring control into rows and columns. However be careful having too wide a table as it will not then fit well on a mobile phone. However it could be use for say organising pictures into two columns for example.
- Source: It is possible to edit the raw HTML code to introduce HTML tags etc. If you know HTML this can be useful.
The Websys system uses what is called CSS style sheets to style HTML in standard way for the website. This defines the font, the default font size, what headers look like, spacings, colours etc. Although it is possible to override these in the HTML document it is recommended not to do this unless really needed as then the website cannot be re-styled easily and often the web pages produced do not match the websites standard style.
If needed, and if users have an understanding of HTML formatting, the "Source" mode of editing can be used for more control over the page layout and contents. Use the menus "Source" button to access this.
Pictures
Pictures can be inserted with the "image" menu button. You can either use a picture existing on the web system or upload new pictures using using the "Browse Server" button. You can actually link to pictures off-site, but there is a danger these will disappear after a time.
The "Browse Server" button pops up the FileBrowser with an Upload area in the bottom left hand corner. To select a picture simply double click on it. By default the FileBrowser will be located in the directory/folder where the file being edited resides.
When uploading images, the images will be automatically resized to 1920x1080 pixels to reduce file upload time and storage on the server. The images can be rotated from the FileBrowser.
The size of the image may be adjusted using the 'image properties'. By default the system will resize pictures to 100% of the width of the screen or table column they are in. It is best to size images to a percentage rather than a fixed size so they will be scaled to the display they are show on. However if you want to resize them smaller they can be resized to the size required if needed by clicking on them and using the resize handles at the image corners. Most mobile phone browsers will actually resize images to fit irrespective of the size you enter.
Pictures can be made to "float" to the left or right of the page with the text flowing around as wanted. The "Image properties" dialogue's "Align" field can be set for this.
Inserting images into table cells is sometimes useful for ordering/collating multiple images. Note that images will be resized automatically for the device being viewed on.
Links
As well as images, links to on-site or off-site information can be inserted using the link button. Also maps, videos etc. can be inserted. Each link has a URL and a textual title. Where possible use relative directory/file names using the Protocol "<other>".
HTML Layout
The WEB pages will resize when viewed on a mobile phone. However, it is important to not produce pages with things that need a large fixed width like multiple columns or tables with lots of columns for this to work well.
If you want multiple columns you ideally want to use what are called "div" blocks so that these columns can disappear (become one column) when viewed on a mobile phone. If you want this sort of page layout see some of the other web pages on how to do it. You will need to use the source mode and have some knowledge of HTML and CSS to do this. Contact us for help on this.
If you use the Google Chrome or the Firefox web browsers there are tools to view the page as if you were using a mobile phone or other device that allows the layout to be checked. They also provide tools to view the HTML and style settings in use. The "Web developer Tools" is normally the function to use. There is then a "Responsive Design Mode" button or similar to show how the page would look on a particular device.
Special Inline Code Blocks
There are some special "<websys>" script entries on the page that include the RO's information, News, What's On, Showcase and Documents live information. These automatically insert the appropriate information on the webpage. Be careful not to delete these (they look like a name with ()'s eg. "groupContact()"). To edit/move these you will need to edit the page source with the "Source" button and have some understanding of using HTML tags.
Make sure you click on the Menu's save button or the "Submit" button at the bottom of the page to commit your work before moving off this page or use the <CTRL>-S key sequence.
The Special, website generated, blocks can be included using the following code entered in "Source" mode:
<websys>whatsOnList()</websys>
There are a few functions that can be used. These currently include:
| groupContact() | The groups contact |
| newsListAdd(height, "news") | This shows the recent news in a window 300 pixels high |
| whatsOnList(3) | The next 3 entries from the What's On list |
| documentList(3) | The next 3 entries from the documents |
| showcaseGroup(3) | The next 3 entries from the showcase |
| picturesRandomImage(width=30%) | A random picture from the system with given width as a percentage of the page width |
Website Style
Please see the Website Style Guide for information on style.
Articles
When adding a document or set of documents about a topic, it is useful to place all the files in a directory (folder) of its own with a suitable name. Ideally the directories name will not have spaces and can use the camel case format (Capitalise character at each word) or an "_" separating words. When referring to the link in another document the text here can use the full title including the spaces.
The index.html file in the directory can be the main document but other separate HTML pages can be incudde along with the pictures used.